Scientific Optical Hardware Diagram
一份详细的光学平台设置 3D 示意图,包含标注组件、插图说明及描述性标题。
{
"type": "scientific hardware diagram",
"layout": {
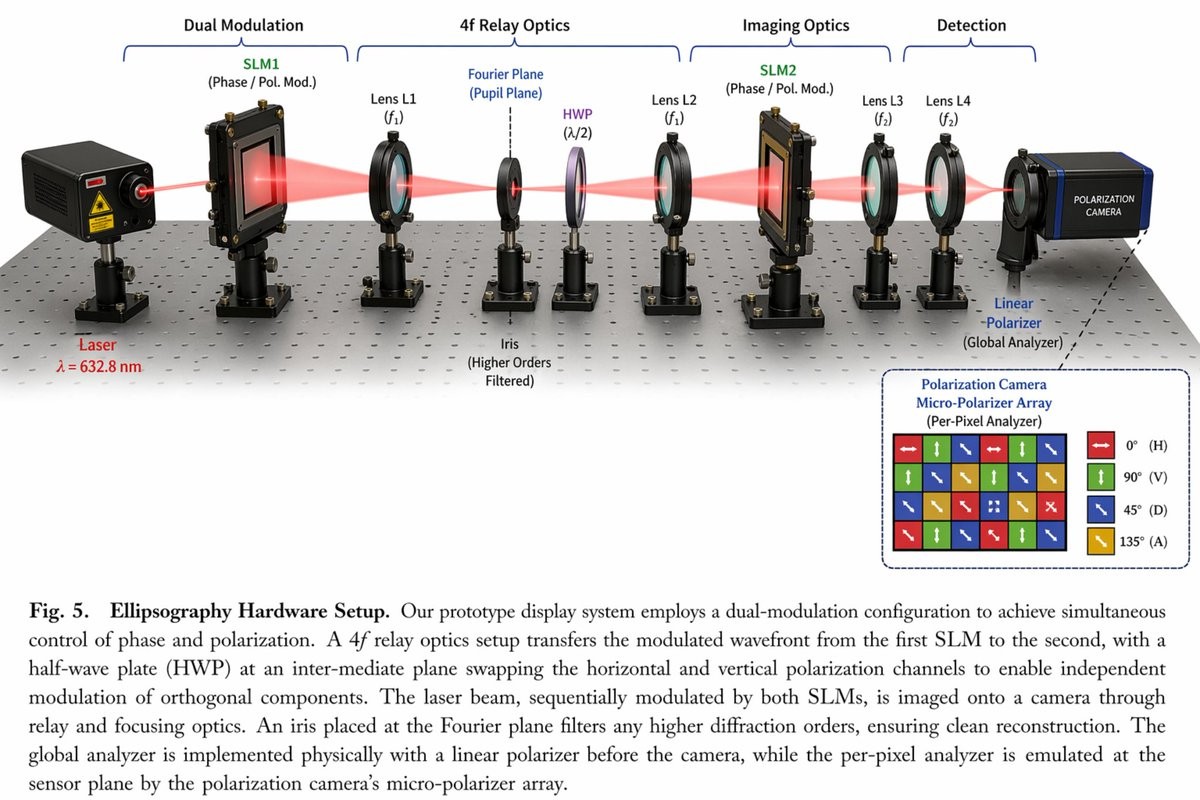
"main_scene": "3D render of an optical table with a red laser beam passing through 11 aligned optical components mounted on black posts.",
"top_brackets": [
{"label": "Dual Modulation", "span": "SLM1"},
{"label": "4f Relay Optics", "span": "Lens L1 to Lens L2"},
{"label": "Imaging Optics", "span": "SLM2 to Lens L4"},
{"label": "Detection", "span": "Camera"}
],
"optical_components_left_to_right": [
{"name": "Laser", "labels": ["Laser", "λ = {argument name=\"laser wavelength\" default=\"632.8 nm\"}"]},
{"name": "SLM1", "labels": ["SLM1", "(Phase / Pol. Mod.)"]},
{"name": "Lens L1", "labels": ["Lens L1", "(f1)"]},
{"name": "Iris", "labels": ["Fourier Plane", "(Pupil Plane)", "Iris", "(Higher Orders Filtered)"]},
{"name": "HWP", "labels": ["HWP", "(λ/2)"]},
{"name": "Lens L2", "labels": ["Lens L2", "(f1)"]},
{"name": "SLM2", "labels": ["SLM2", "(Phase / Pol. Mod.)"]},
{"name": "Lens L3", "labels": ["Lens L3", "(f2)"]},
{"name": "Lens L4", "labels": ["Lens L4", "(f2)"]},
{"name": "Linear Polarizer", "labels": ["Linear", "-Polarizer", "(Global Analyzer)"]},
{"name": "Polarization Camera", "labels": ["POLARIZATION CAMERA"]}
],
"inset_box": {
"position": "bottom right",
"title": "Polarization Camera Micro-Polarizer Array (Per-Pixel Analyzer)",
"grid": "4x4 grid of colored squares with directional arrows",
"legend_count": 4,
"legend_items": [
"Red square, horizontal arrow, 0° (H)",
"Green square, vertical arrow, 90° (V)",
"Blue square, diagonal arrow, 45° (D)",
"Yellow square, diagonal arrow, 135° (A)"
]
},
"bottom_caption": {
"figure_prefix": "{argument name=\"figure number\" default=\"Fig. 5.\"}",
"title": "{argument name=\"system name\" default=\"Ellipsography Hardware Setup.\"}",
"text": "Paragraph of scientific text explaining the dual-modulation configuration, 4f relay optics, and polarization camera."
}
}
} {
"type": "科学硬件示意图",
"layout": {
"main_scene": "光学平台的 3D 渲染图,红色激光束穿过安装在黑色支柱上的 11 个对齐的光学组件。",
"top_brackets": [
{"label": "双重调制", "span": "SLM1"},
{"label": "4f 中继光学系统", "span": "透镜 L1 至透镜 L2"},
{"label": "成像光学系统", "span": "SLM2 至透镜 L4"},
{"label": "检测", "span": "相机"}
],
"optical_components_left_to_right": [
{"name": "激光器", "labels": ["激光器", "λ = {argument name=\"laser wavelength\" default=\"632.8 nm\"}"]},
{"name": "SLM1", "labels": ["SLM1", "(相位 / 偏振调制)"]},
{"name": "透镜 L1", "labels": ["透镜 L1", "(f1)"]},
{"name": "光阑", "labels": ["傅里叶平面", "(光瞳平面)", "光阑", "(滤除高阶项)"]},
{"name": "半波片 (HWP)", "labels": ["HWP", "(λ/2)"]},
{"name": "透镜 L2", "labels": ["透镜 L2", "(f1)"]},
{"name": "SLM2", "labels": ["SLM2", "(相位 / 偏振调制)"]},
{"name": "透镜 L3", "labels": ["透镜 L3", "(f2)"]},
{"name": "透镜 L4", "labels": ["透镜 L4", "(f2)"]},
{"name": "线性偏振片", "labels": ["线性", "-偏振片", "(全局分析器)"]},
{"name": "偏振相机", "labels": ["偏振相机"]}
],
"inset_box": {
"position": "右下角",
"title": "偏振相机微偏振片阵列 (像素级分析器)",
"grid": "带有方向箭头的 4x4 彩色方块网格",
"legend_count": 4,
"legend_items": [
"红色方块,水平箭头,0° (H)",
"绿色方块,垂直箭头,90° (V)",
"蓝色方块,对角箭头,45° (D)",
"黄色方块,对角箭头,135° (A)"
]
},
"bottom_caption": {
"figure_prefix": "{argument name=\"figure number\" default=\"图 5.\"}",
"title": "{argument name=\"system name\" default=\"椭圆偏振成像硬件设置。\"}",
"text": "解释双重调制配置、4f 中继光学系统和偏振相机的科学段落。"
}
}
} {
"type": "과학적 하드웨어 다이어그램",
"layout": {
"main_scene": "검은 기둥에 장착된 11개의 정렬된 광학 부품을 통과하는 빨간 레이저 빔을 가진 광학 테이블의 3D 렌더링.",
"top_brackets": [
{"label": "이중 변조", "span": "SLM1"},
{"label": "4f 릴레이 광학", "span": "렌즈 L1에서 렌즈 L2까지"},
{"label": "이미징 광학", "span": "SLM2에서 렌즈 L4까지"},
{"label": "검출", "span": "카메라"}
],
"optical_components_left_to_right": [
{"name": "레이저", "labels": ["레이저", "λ = {argument name=\"laser wavelength\" default=\"632.8 nm\"}" ]},
{"name": "SLM1", "labels": ["SLM1", "(위상 / 편광 변조)" ]},
{"name": "렌즈 L1", "labels": ["렌즈 L1", "(f1)" ]},
{"name": "아이리스", "labels": ["푸리에 평면", "(동공 평면)", "아이리스", "(고차 필터링됨)" ]},
{"name": "HWP", "labels": ["HWP", "(λ/2)" ]},
{"name": "렌즈 L2", "labels": ["렌즈 L2", "(f1)" ]},
{"name": "SLM2", "labels": ["SLM2", "(위상 / 편광 변조)" ]},
{"name": "렌즈 L3", "labels": ["렌즈 L3", "(f2)" ]},
{"name": "렌즈 L4", "labels": ["렌즈 L4", "(f2)" ]},
{"name": "선형 편광기", "labels": ["선형", "-편광기", "(글로벌 분석기)" ]},
{"name": "편광 카메라", "labels": ["편광 카메라"]}
],
"inset_box": {
"position": "오른쪽 아래",
"title": "편광 카메라 마이크로 편광기 배열 (픽셀별 분석기)",
"grid": "방향 화살표가 있는 색상 정사각형의 4x4 그리드",
"legend_count": 4,
"legend_items": [
"빨간 정사각형, 수평 화살표, 0° (H)",
"녹색 정사각형, 수직 화살표, 90° (V)",
"파란 정사각형, 대각선 화살표, 45° (D)",
"노란 정사각형, 대각선 화살표, 135° (A)"
]
},
"bottom_caption": {
"figure_prefix": "{argument name=\"figure number\" default=\"Fig. 5.\"}",
"title": "{argument name=\"system name\" default=\"엘립소그래피 하드웨어 설정.\"}",
"text": "이중 변조 구성, 4f 릴레이 광학 및 편광 카메라를 설명하는 과학적 텍스트의 단락."
}
}
}