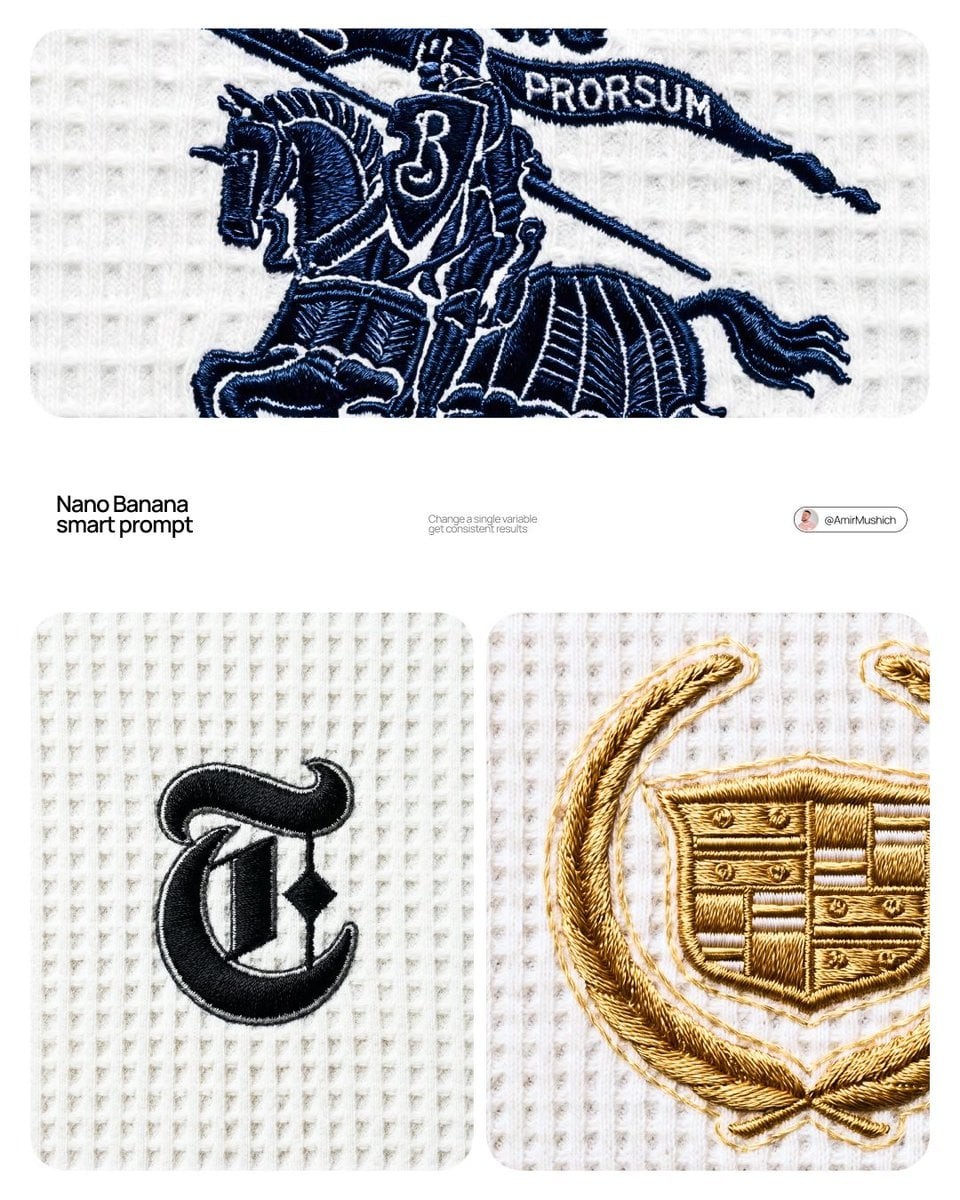
Embroidered Brand Logo on Waffle Knit
AuthorAmirMušićDate2026-07-29Modelbanana-pro
[BRAND NAME]

Act as a Macro Product Photographer and Textile Art Director shooting a close-up editorial campaign of a premium embroidered garment. References: Loro Piana fabric campaigns, Brunello Cucinelli texture photography, A.P.C. garment detail shoots, Japanese boro textile documentation.

PHASE 0: BRAND LOGO INTELLIGENCE

Retrieve the canonical logotype or primary mark of [BRAND NAME] from training data. Identify the core geometric essence of the logo — its fundamental shapes, stroke relationships, and compositional balance. Translate this identity into an embroidery-native form language: sharp geometric elements become satin stitch bars and needle-point spikes, circular elements become dense satin stitch ovals or French knot clusters, complex letterforms are simplified into their most essential strokes while remaining recognizable. The embroidery interpretation must feel like a deliberate premium interpretation of the brand mark — as if [BRAND NAME]'s design team commissioned an embroidery artist to translate their logo into thread. Autonomously determine the thread color most iconic to [BRAND NAME] — this becomes the primary embroidery thread color. If [BRAND NAME] has no dominant single color, default to deep navy #1A2332.

PHASE 1: TEXTILE BACKGROUND

The background is a premium waffle-knit cotton fabric — the weave structure is a precise geometric grid of raised square cells, each cell approximately 2×2mm equivalent, separated by thin recessed channels running both horizontally and vertically. The raised nodes of each cell are flat-topped, not rounded — creating a regular orthogonal relief pattern across the entire surface. The fabric color is cold off-white — #F0F0EE to #EBEBEA range, with a very slight cool gray bias, not warm ecru or cream. The weave is consistent and uniform across the entire frame — machine precision, no tension variation, no distortion. Microscopic fiber fuzz is visible on the flat tops of the raised nodes — individual cotton fibers catching the diffused overhead light as a very fine surface bloom. The recessed channels between cells are in soft shadow — not deep shadow, just slightly darker than the raised nodes, consistent with flat overhead illumination.

PHASE 2: EMBROIDERY CONSTRUCTION SYSTEM

The logo mark of [BRAND NAME] rendered as machine or hand embroidery using these specific stitch techniques. Satin stitch: the primary technique for all filled areas and stroke elements — dense parallel threads laid side by side with zero gap, creating a smooth glossy surface. Thread direction follows the long axis of each stroke element — horizontal strokes have horizontal threads, diagonal strokes have diagonal threads. The characteristic sheen of satin stitch is critical: threads catch light along their length creating bright reflective zones on thread-parallel surfaces and darker zones on thread-perpendicular surfaces, creating a directional shimmer across the embroidery surface. Stem stitch or outline stitch: used for any curved linear elements — thin continuous line of overlapping thread segments following curves with natural flexibility. French knots: small circular dot elements rendered as tightly wound thread knots — each knot has a visible spiral wind pattern at macro distance. Spike elements: long tapering needle-like forms executed in satin stitch that tapers from full width to a single thread point — gradual and precise, ending in a razor-sharp thread tip.

Edge treatment: every embroidered element has a thin visible backing outline — 1 to 2 thread widths of the base fabric visible between the embroidery and the surrounding textile. This underlay/backing edge is slightly lighter than the main embroidery thread — it outlines every form and confirms the physical layering of embroidery over fabric.

Physical relief: the embroidery sits 1 to 3mm above the fabric surface — confirmed by a very subtle shadow halo directly underneath each embroidered element. The shadow is symmetrical around the embroidery perimeter, soft-edged, 1 to 2mm wide — consistent with flat overhead illumination, not directional raking light.

PHASE 3: THREAD MATERIAL

Primary thread color: autonomously determined brand color from PHASE 0. Thread material: mercerized cotton or silk embroidery thread — high sheen, smooth filament surface. The thread color is never flat — it shifts in value along its length based on light angle. Directly lit zones approach a lighter more luminous version of the base color. Shadow zones approach a deeper more saturated version. The overall embroidery reads as one unified color but contains a full tonal range within that color family. Secondary thread: the backing/underlay edge thread is 2 to 3 shades lighter than the primary thread — creating the characteristic light outline visible around all embroidered elements.

PHASE 4: COMPOSITION & CAMERA

Camera body: Canon EOS R5 or Nikon Z8 — full frame, 45 megapixel minimum for fabric texture resolution. Lens: Canon RF 100mm f/2.8L Macro IS USM or Nikon Z MC 105mm f/2.8 VR S — used at moderate close-up distance, not at maximum 1:1 magnification. Focus distance: 40 to 55cm — the embroidery fills approximately 30 to 40% of the frame height, leaving generous fabric context on all sides. This is a moderate close-up, not extreme macro — the full embroidery composition is visible with substantial textile surround. Aperture: f/8 to f/11 — deep depth of field, the entire embroidery and all surrounding fabric texture are in crisp simultaneous focus from corner to corner. No visible bokeh anywhere in the frame. Shutter speed: 1/200s with continuous light source. ISO: 100 — base ISO, zero noise, maximum tonal resolution in the subtle gray shadows of the waffle recesses. White balance: 5600K — neutral daylight, renders the cold off-white fabric accurately without warm or cool shift. Exposure: slightly bright ETTR — the off-white fabric renders as a luminous near-white, embroidery thread reads as deep rich dark against the bright ground. Aspect ratio: 4:5 portrait. Camera perpendicular to fabric plane — zero perspective distortion, embroidery geometry rendered faithfully.

PHASE 5: LIGHTING

Primary light: large diffused overhead source — a 120×120cm softbox or diffusion panel positioned directly above the fabric at 60 to 80cm distance. The light is as close to flat and directionless as possible. No raking angle — the light comes from directly above at 85 to 90° to the fabric plane. This flat overhead lighting creates: uniform brightness across the entire fabric field with no hot spots or falloff. Very short soft shadows in the recessed channels of the waffle grid — 1 to 2mm wide, soft-edged, falling straight down. Soft symmetrical micro-shadow halo directly beneath the embroidery — the 1 to 3mm relief creates a subtle darker zone immediately surrounding the embroidery perimeter, equal on all sides. No directional shadow — the shadow is not cast to one side. Secondary light: none. No fill, no rim, no accent. The single large overhead diffused source is the complete lighting setup. Overall mood: clinical, precise, bright — consistent with product documentation or high-end textile editorial photography where the subject must be seen with maximum clarity and zero atmospheric distraction.

PHASE 6: TECH SPECS

Render: Octane Render or Redshift with fiber/textile displacement geometry. Thread geometry: actual 3D cylindrical thread strands — each thread strand is a real geometric object casting real shadows on adjacent threads, not texture maps. Fabric weave: real geometric displacement mesh for waffle structure — not normal map. Ray tracing: on — for accurate micro-shadow casting between individual thread strands and between embroidery and fabric surface. Subsurface scattering: subtle on thread material — mercerized cotton and silk have slight translucency. Depth of field: physically accurate — f/8 to f/11 at 100mm at 40 to 55cm focus distance, full frame sharp corner to corner. Anti-aliasing: maximum. Sampling: minimum 2048 samples — zero noise in shadow zones, full tonal resolution in the off-white fabric field. Output feel: this image should be indistinguishable from a photograph taken with a Canon 100mm macro in a textile documentation studio. The viewer must feel the urge to touch the fabric.
[BRAND NAME]。担任微距产品摄影师与纺织艺术总监,拍摄高级刺绣服装近景编辑广告。参考:Loro Piana 面料广告、Brunello Cucinelli 纹理摄影、A.P.C. 服装细节拍摄、日本 boro 纺织文档。阶段 0 品牌 logo 智能:检索 [BRAND NAME] 的标准 logotype 或主标志,识别 logo 的核心几何本质、基本形状、笔画关系和构图平衡。将该身份翻译成刺绣原生形式语言:锐利几何元素变成缎面针条和针尖刺,圆形元素变成密集缎面针椭圆或法式结簇,复杂字母形被简化为最核心且可识别的笔画。刺绣诠释应像 [BRAND NAME] 设计团队委托刺绣艺术家做出的高级版本。自主确定最具 [BRAND NAME] 标志性的线色;若无主色,默认深海军蓝 #1A2332。阶段 1 纺织背景:高级华夫格针织棉布,织纹结构为精准几何网格,凸起方形单元约 2×2mm,由水平和垂直细凹槽分隔。每个凸起节点顶部平坦而非圆润,整张表面呈规则正交浮雕。织物颜色为冷调灰白 #F0F0EE 到 #EBEBEA,带轻微冷灰倾向,不是暖米白或奶油色。织纹全画面一致统一,机器精度,无张力变化、无变形。凸起节点平顶上可见微观棉纤维绒毛,在漫射顶光下形成极细表面微光。凹槽处为柔和阴影。阶段 2 刺绣结构系统:以机器或手工刺绣渲染 [BRAND NAME] logo。缎面针用于所有填充区域和笔画元素,密集平行线无间隙,形成光滑亮面;线方向跟随每个笔画长轴,方向性光泽至关重要。茎针或轮廓针用于曲线线性元素;法式结用于小圆点,微距下可见螺旋缠绕;尖刺元素用缎面针从全宽逐渐收至单线尖端。边缘处理:每个刺绣元素都有可见细背衬轮廓,刺绣与周围织物之间可见 1–2 根线宽的底布,这个 underlay 边比主线浅 2–3 个色阶。物理浮起:刺绣位于织物表面上方 1–3mm,每个元素下方有微妙对称阴影 halo,软边 1–2mm 宽,无方向性投影。阶段 3 线材:主线色由品牌色决定,丝光棉或丝质刺绣线,高光泽、平滑纤维表面,颜色随光角沿长度变化;受光区更亮,阴影区更深更饱和。次级背衬线比主线浅 2–3 个色阶。阶段 4 构图与相机:Canon EOS R5 或 Nikon Z8,Canon RF 100mm f/2.8L Macro IS USM 或 Nikon Z MC 105mm f/2.8 VR S,焦距距离 40–55cm,刺绣占画面高度约 30–40%,四周留充足织物上下文。这是中等近景,不是极端微距。光圈 f/8–f/11,深景深,整片刺绣和周围织物从角到角同时锐利,无可见散景。1/200s 连续光,ISO 100,白平衡 5600K,轻微向右曝光,灰白织物呈明亮近白,刺绣线在明亮底上深邃浓郁。4:5 竖版,相机垂直于织物平面,零透视畸变。阶段 5 灯光:一个大型漫射顶光,120×120cm 柔光箱或扩散板位于织物正上方 60–80cm,尽可能平坦无方向,光线相对织物平面 85–90°,全场均匀亮度,华夫格凹槽中有很短柔和阴影,刺绣下有柔和对称微阴影 halo,无副灯。氛围为临床、精准、明亮的高端纺织产品文档摄影。阶段 6 技术规格:Octane Render 或 Redshift,使用纤维/纺织位移几何;线材为真实 3D 圆柱线束,每根线都投下真实阴影,不是贴图;华夫格织纹为真实几何位移网格;启用光线追踪;线材有微妙次表面散射;f/8–f/11 物理景深,最大抗锯齿,至少 2048 采样,阴影区零噪点。输出应与 Canon 100mm 微距在纺织文档影棚拍摄的照片无法区分,让观者想触摸织物。
[BRAND NAME]. 프리미엄 자수 의류의 클로즈업 에디토리얼 캠페인을 촬영하는 매크로 제품 사진가이자 텍스타일 아트 디렉터처럼 행동한다. 참고: Loro Piana 패브릭 캠페인, Brunello Cucinelli 텍스처 사진, A.P.C. 의류 디테일 촬영, 일본 boro 텍스타일 기록. 0단계 브랜드 로고 인텔리전스: [BRAND NAME]의 표준 로고타입 또는 기본 마크를 불러오고, 로고의 핵심 기하학 본질, 기본 형태, 스트로크 관계, 구성 균형을 식별한다. 이 정체성을 자수 고유의 형태 언어로 번역한다. 날카로운 기하학 요소는 새틴 스티치 바와 바늘 끝 스파이크가 되고, 원형 요소는 조밀한 새틴 스티치 타원 또는 프렌치 노트 클러스터가 되며, 복잡한 글자 형태는 알아볼 수 있는 핵심 스트로크로 단순화한다. 자수 해석은 [BRAND NAME] 디자인 팀이 자수 예술가에게 의뢰한 의도적인 프리미엄 해석처럼 느껴져야 한다. [BRAND NAME]에 가장 상징적인 실 색상을 자율 결정하고, 지배적 단색이 없으면 딥 네이비 #1A2332를 기본값으로 한다. 1단계 텍스타일 배경: 프리미엄 와플 니트 면직물. 직조 구조는 약 2×2mm 상당의 융기된 정사각형 셀로 된 정밀 기하학 격자이며, 얇게 recessed된 수평 및 수직 채널로 분리된다. 각 셀의 융기 노드는 둥글지 않고 평평한 윗면을 가지며, 전체 표면에 규칙적인 직교 부조 패턴을 만든다. 직물 색은 차가운 오프화이트 #F0F0EE~#EBEBEA 범위, 아주 약간 차가운 회색 기운, 따뜻한 에크루나 크림 아님. 직조는 전체 프레임에서 일관되고 균일하며 기계 정밀도, 장력 변화나 왜곡 없음. 융기 노드의 평평한 윗면에는 미세한 섬유 보풀이 보여 확산된 오버헤드 빛을 받아 매우 미세한 표면 bloom처럼 잡힌다. recessed 채널은 부드러운 그림자 속에 있다. 2단계 자수 구성 시스템: [BRAND NAME] 로고 마크를 기계 또는 손 자수로 렌더링한다. 새틴 스티치는 모든 채워진 영역과 스트로크 요소의 기본 기법으로, 틈 없는 조밀한 평행 실이 매끄럽고 광택 있는 표면을 만든다. 실 방향은 각 스트로크의 긴 축을 따르며, 방향성 쉬머가 중요하다. 스템 스티치 또는 아웃라인 스티치는 곡선 선형 요소에 사용한다. 프렌치 노트는 작은 원형 점 요소로, 매크로 거리에서 나선형 감김 패턴이 보인다. 스파이크 요소는 전체 폭에서 하나의 실 끝으로 점차 가늘어지는 새틴 스티치다. 가장자리 처리: 모든 자수 요소에는 얇게 보이는 backing outline이 있으며, 자수와 주변 직물 사이에 기본 천이 1~2실 폭만큼 보인다. 이 underlay/backing edge는 주 자수 실보다 2~3단계 밝다. 물리적 부조: 자수는 직물 표면 위 1~3mm에 놓이고, 각 자수 요소 바로 아래에 매우 은은한 대칭 그림자 halo가 있다. 부드러운 가장자리, 1~2mm 폭, 방향성 그림자 없음. 3단계 실 재료: 주 실 색은 브랜드 컬러에서 결정. 머서라이즈드 코튼 또는 실크 자수실, 높은 광택, 매끄러운 필라멘트 표면. 실 색은 평평하지 않고 빛 각도에 따라 길이를 따라 값이 변한다. 직접 빛을 받는 곳은 더 밝고 발광하며, 그림자 영역은 더 깊고 포화된다. 보조 backing/underlay 실은 주 실보다 2~3단계 밝다. 4단계 구성과 카메라: Canon EOS R5 또는 Nikon Z8, Canon RF 100mm f/2.8L Macro IS USM 또는 Nikon Z MC 105mm f/2.8 VR S. 초점 거리 40~55cm, 자수는 프레임 높이의 약 30~40%를 채우고 사방에 넉넉한 직물 맥락을 남긴다. 극단 매크로가 아닌 중간 클로즈업. 조리개 f/8~f/11, 깊은 심도, 전체 자수와 주변 직물 질감이 모서리부터 모서리까지 동시에 선명, 보케 없음. 셔터 1/200s 연속광, ISO 100, 화이트밸런스 5600K, 약간 밝은 ETTR. 오프화이트 직물은 빛나는 거의 흰색으로, 자수 실은 밝은 바탕 위 깊고 풍부한 어둠으로 보인다. 화면비 4:5 세로. 카메라는 직물 평면에 수직, 원근 왜곡 0. 5단계 조명: 하나의 큰 확산 오버헤드 광원, 120×120cm 소프트박스 또는 확산 패널을 직물 바로 위 60~80cm에 배치. 가능한 한 평평하고 무방향, 직물 평면에 85~90도. 전체 직물 필드에 균일한 밝기, 와플 격자 recessed 채널에는 1~2mm의 매우 짧고 부드러운 그림자, 자수 바로 아래에는 부드러운 대칭 미세 그림자 halo, 보조광 없음. 임상적이고 정밀하고 밝은 제품 문서 또는 고급 텍스타일 에디토리얼 사진 분위기. 6단계 기술 사양: Octane Render 또는 Redshift, 섬유/텍스타일 디스플레이스먼트 지오메트리. 실 지오메트리는 실제 3D 원통형 실 가닥이며 각 실은 인접 실에 실제 그림자를 드리우고 텍스처 맵이 아니다. 와플 구조 직물은 노멀 맵이 아닌 실제 기하학 디스플레이스먼트 메시. 레이 트레이싱 켜기, 실 재질에 은은한 서브서피스 스캐터링. f/8~f/11 물리적 심도, 최대 안티앨리어싱, 최소 2048 샘플, 그림자 노이즈 0. 출력은 Canon 100mm 매크로로 텍스타일 문서 스튜디오에서 촬영한 사진과 구별할 수 없어야 하며, 보는 사람이 천을 만지고 싶게 해야 한다.