Butter Cookies Recipe
生成 3x3 照片网格,详细展示分步烘焙食谱,并在每一步添加文字说明。
{
"type": "step-by-step recipe tutorial grid",
"recipe": "{argument name=\"recipe name\" default=\"butter cookies\"}",
"style": "top-down food photography, bright natural lighting, photorealistic",
"background": "{argument name=\"background texture\" default=\"white marble countertop\"}",
"layout": {
"grid": "3x3",
"total_panels": 9,
"panels": [
{
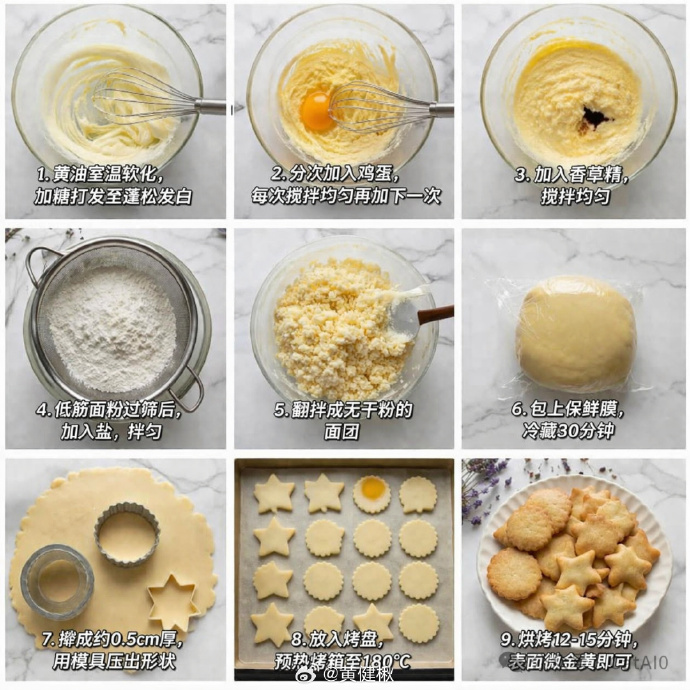
"step": 1,
"visual": "whisking softened butter and sugar in a glass bowl with a metal whisk",
"text_overlay": "{argument name=\"step 1 text\" default=\"1. 黄油室温软化,加糖打发至蓬松发白\"}"
},
{
"step": 2,
"visual": "adding a raw egg yolk to the butter mixture, whisking",
"text_overlay": "2. 分次加入鸡蛋,每次搅拌均匀再加下一次"
},
{
"step": 3,
"visual": "adding dark vanilla extract to the mixture in the glass bowl",
"text_overlay": "3. 加入香草精,搅拌均匀"
},
{
"step": 4,
"visual": "sifting white flour through a round metal sieve into a glass bowl",
"text_overlay": "4. 低筋面粉过筛后,加入盐,拌匀"
},
{
"step": 5,
"visual": "mixing crumbly dough with a spatula in a glass bowl",
"text_overlay": "5. 翻拌成无干粉的面团"
},
{
"step": 6,
"visual": "a smooth ball of dough tightly wrapped in clear plastic wrap",
"text_overlay": "6. 包上保鲜膜,冷藏30分钟"
},
{
"step": 7,
"visual": "rolled out flat dough with round and star-shaped metal cookie cutters cutting out shapes",
"text_overlay": "7. 擀成约0.5cm厚,用模具压出形状"
},
{
"step": 8,
"visual": "raw star and round cookie dough shapes arranged neatly on a parchment-lined baking sheet",
"text_overlay": "8. 放入烤盘,预热烤箱至180°C"
},
{
"step": 9,
"visual": "{argument name=\"final product\" default=\"baked golden-brown star and round cookies piled on a white fluted plate\"}",
"text_overlay": "{argument name=\"step 9 text\" default=\"9. 烘烤12-15分钟,表面微金黄即可\"}"
}
]
}
} {
"type": "分步照片教程网格",
"subject": "{argument name=\"recipe subject\" default=\"黄油曲奇\"}",
"style": "俯视美食摄影,明亮的自然光,简洁美观",
"background": "{argument name=\"background surface\" default=\"白色大理石台面\"}",
"layout": {
"grid": "3x3",
"panel_count": 9,
"panels": [
{
"step": 1,
"image_description": "在透明玻璃碗中用手动打蛋器搅拌黄油和糖",
"text_overlay": "1. 黄油室温软化,加糖打发至蓬松发白"
},
{
"step": 2,
"image_description": "在黄油混合物中加入生蛋黄,打蛋器放在碗中",
"text_overlay": "2. 分次加入鸡蛋,每次搅拌均匀再加下一次"
},
{
"step": 3,
"image_description": "向混合物中加入深色香草精",
"text_overlay": "3. 加入香草精,搅拌均匀"
},
{
"step": 4,
"image_description": "通过金属筛网将白面粉筛入玻璃碗中",
"text_overlay": "4. 低筋面粉过筛后,加入盐,拌匀"
},
{
"step": 5,
"image_description": "用刮刀搅拌酥松的面团",
"text_overlay": "5. 翻拌成无干粉的面团"
},
{
"step": 6,
"image_description": "用透明保鲜膜紧紧包裹的光滑面团球",
"text_overlay": "6. 包上保鲜膜,冷藏 30 分钟"
},
{
"step": 7,
"image_description": "擀平的面团,用金属饼干模具压出星星和扇形圆圈形状",
"text_overlay": "7. 擀成约 0.5cm 厚,用模具压出形状"
},
{
"step": 8,
"image_description": "生饼干坯整齐地排列在铺有烘焙纸的烤盘上",
"text_overlay": "8. 放入烤盘,预热烤箱至 180°C"
},
{
"step": 9,
"image_description": "成品金黄色的饼干堆放在白色花边盘子上,角落里放着一些干薰衣草",
"text_overlay": "{argument name=\"final step text\" default=\"9. 烘烤 12-15 分钟,表面微金黄即可\"}"
}
]
}
} {
"type": "단계별 레시피 튜토리얼 그리드",
"recipe": "{argument name=\"recipe name\" default=\"버터 쿠키\"}",
"style": "탑다운 음식 사진, 밝은 자연광, 포토리얼리즘",
"background": "{argument name=\"background texture\" default=\"흰 대리석 조리대\"}",
"layout": {
"grid": "3x3",
"total_panels": 9,
"panels": [
{
"step": 1,
"visual": "유리 그릇에서 부드러운 버터와 설탕을 금속 거품기로 휘젓는 모습",
"text_overlay": "{argument name=\"step 1 text\" default=\"1. 버터를 실온에서 부드럽게 하고, 설탕을 넣어 휘핑하여 부풀게 한다\"}"
},
{
"step": 2,
"visual": "버터 혼합물에 생계란 노른자를 추가하고 휘젓는 모습",
"text_overlay": "2. 계란을 조금씩 넣고 매번 고르게 섞은 후 다음을 추가한다"
},
{
"step": 3,
"visual": "혼합물에 다크 바닐라 추출물을 추가하는 모습",
"text_overlay": "3. 바닐라 에센스를 추가하고 고르게 섞는다"
},
{
"step": 4,
"visual": "금속 체를 통해 흰 밀가루를 유리 그릇에 체치는 모습",
"text_overlay": "4. 저온 밀가루를 체친 후 소금을 추가하고 섞는다"
},
{
"step": 5,
"visual": "유리 그릇에서 주걱으로 부서지는 반죽을 섞는 모습",
"text_overlay": "5. 가루가 남지 않도록 반죽을 섞는다"
},
{
"step": 6,
"visual": "투명 랩으로 단단히 싸인 매끄러운 반죽 공",
"text_overlay": "6. 랩으로 싸고 냉장고에서 30분 동안 식힌다"
},
{
"step": 7,
"visual": "밀가루 반죽을 밀어내고 금속 쿠키 커터로 별과 원형 모양을 자르는 모습",
"text_overlay": "7. 약 0.5cm 두께로 밀고 모양을 자른다"
},
{
"step": 8,
"visual": "생 쿠키 반죽 모양이 베이킹 시트에 가지런히 배열된 모습",
"text_overlay": "8. 베이킹 시트에 놓고 오븐을 180°C로 예열한다"
},
{
"step": 9,
"visual": "{argument name=\"final product\" default=\"구워진 황금빛 별과 원형 쿠키가 흰색 프릴 접시에 쌓여 있는 모습\"}",
"text_overlay": "{argument name=\"step 9 text\" default=\"9. 12-15분 동안 구워서 표면이 약간 금색이 될 때까지 구운다\"}"
}
]
}
}